
Bevy games on iOS
04 Jan 2023Bevy
Bevy is a game engine (in Rust) which works on a data-driven model. Entities
are collections of Components, on which Systems run. I’m kinda new to this
but, simply put, components are objects representing properties of a thing
in game. Then there are systems which are run on components, e.g. a physics
system might operate on components with a Kinematics component. This makes it
easy to create a modular game - systems can be easily added and removed. It takes
a different way of thinking, but I can see glimpses of the power of the system.
This differs from more traditional systems like Unity’s very object-oriented
GameObject based system (which I ripped off in my unfinished
game engine - bounce). Object composition
through the components system here gives a similar power - and it clearly works
very well: Unity is extremely popular. Unity also shares another feature with Bevy,
cross-platform support.
Unity projects can be built for any of the major platforms (MacOS, Windows, Linux, Android, iOS) and even consoles (with some additional SDK). Bevy supports the desktop OSs well and out-of-the box, but Android and iOS suffer from a little complication. Bevy is a relatively young project under active development and is rapidly evolving, so there are limited guides out there on building for iOS. This post collects useful links together and provides a simple guide for getting started with Bevy on iOS.
Some light reading
Let’s start by mildly rolling back something I said earlier: there isn’t a lot out there on using Bevy on iOS, but there are two great resources I’ve found:
The first is an article by the developers of a mobile app (“Visly”?) that uses Rust, and targets both iOS and Android. They go through some of the steps for building a project with a Rust component for iOS, how it needs to be compiled, how the xcode project needs to be set up, and so on.
The latter is the GitHub issue discussing iOS support for Bevy (!) - very relevant to this post! In fact, the first source I got from the issue, but I thought it was worth pointing out as a source in its own right as it contains most of the steps. There’s little to be done that isn’t explained in that medium article.
iOS and Bevy
Install tools
First up, we need some tools to make things a bit easier.
cbindgen is handy for generating c
headers for Rust libraries (which we’ll need to tell xcode what we’re
exporting). We’ll also need cargo-lipo,
a cargo extension providing a subcommand which builds universal iOS library.
(This is not strictly necessary, but makes life infinitely easier when working
between real and simulated devices.) These tools can be installed with:
cargo install cbindgen cargo-lipo
You can check they’ve been installed properly (and are available on $PATH) with
cbindgen --help
cargo lipo --help
Set up project
You’ll need your project to target a static lib. Edit your Cargo.toml:
[lib]
name = "your_library_name"
crate-type = ["staticlib", "rlib"]
I include rlib up there too to make it easier to run natively (for testing pruposes).
Make sure that you have the entry point to your bevy app (where you call App::run)
public in lib.rs, with both extern "C" and #[no_mangle]:
use bevy::prelude::*;

#[no_mangle]
pub extern "C" fn bevy_main() {
  App::new()
    // set up and stuff
    .run();
}
Build
To build the project you can either build it specifically for a known target (i.e. if you’re going to execute on a known architecture - iPhone or simulator) or you can build a universal library and not worry about it.
cargo lipo --release
will build a universal library and place it in target/universal/release.
Generate headers
It’s not terribly onerous to write a header for a library, but cbindgen will do
it for us:
cbindgen <path/to/lib.rs> -l c > <path/to/header.h>
will create a header corresponding to the library at the given path. Check the header to make sure what you expect to be available is indeed available.
Set up Xcode project
Right so here’s the tiresome step. You need to create a new Xcode project. I find it handy to keep it in the same directory as the rust library, but it’s up to you.
Create a new iOS app project. You can use either Swift or Objective-C, storyboard or SwiftUI, doesn’t matter. I’ll be giving examples using Objective-C. We’ll be ripping most of that boilerplate out later on anyway. Name the project whatever you want and hit “create”.
With the project created, you can delete everything that isn’t the main.m file. Strip out the contents of “Info.plist” as well, anything related to the storyboard and so on.
Next, we need to tell Xcode where to find our library and header. Let’s create directories for each in the Xcode project directory: “lib” and “include”. Then copy the generated header and built library into the relevant directory:
# from bevy project root
mkdir -p <xcode-project-dir>/lib
mkdir -p <xcode-project-dir>/include
cp <rust.h> <xcode-project-dir>/include/.
cp target/universal/release/<lib.a> <xcode-project-dir>/lib/.
Add the include directory to the search path (in Xcode: project -> Build Settings -> Search Paths -> Header Search Paths) and also add the include directory to the search path (in Xcode: project -> Build Settings -> Search Paths -> Library Search Paths).
Add the library to the list of frameworks (in Xcode: project -> General -> Frameworks). You’ll also need to add some frameworks:
- UIKit.framework
- AudioToolbox.framework
- Metal.framework
as well as a reference to libc++.tbd.
Last thing before we can build the iOS app, let’s sort out the main.m file.
Bevy will handle the creation of windows and so on, so go
ahead and edit main.m to use our main function:
#include <UIKit/UIKit.h>
#include <rust.h>

int main() {
  bevy_main();
  return 0;
}
If your library was called rust.h and your main function is called bevy_main.
All going well you should be able to build an iOS app and run it in the simulator!
Wait, what’s gone wrong?
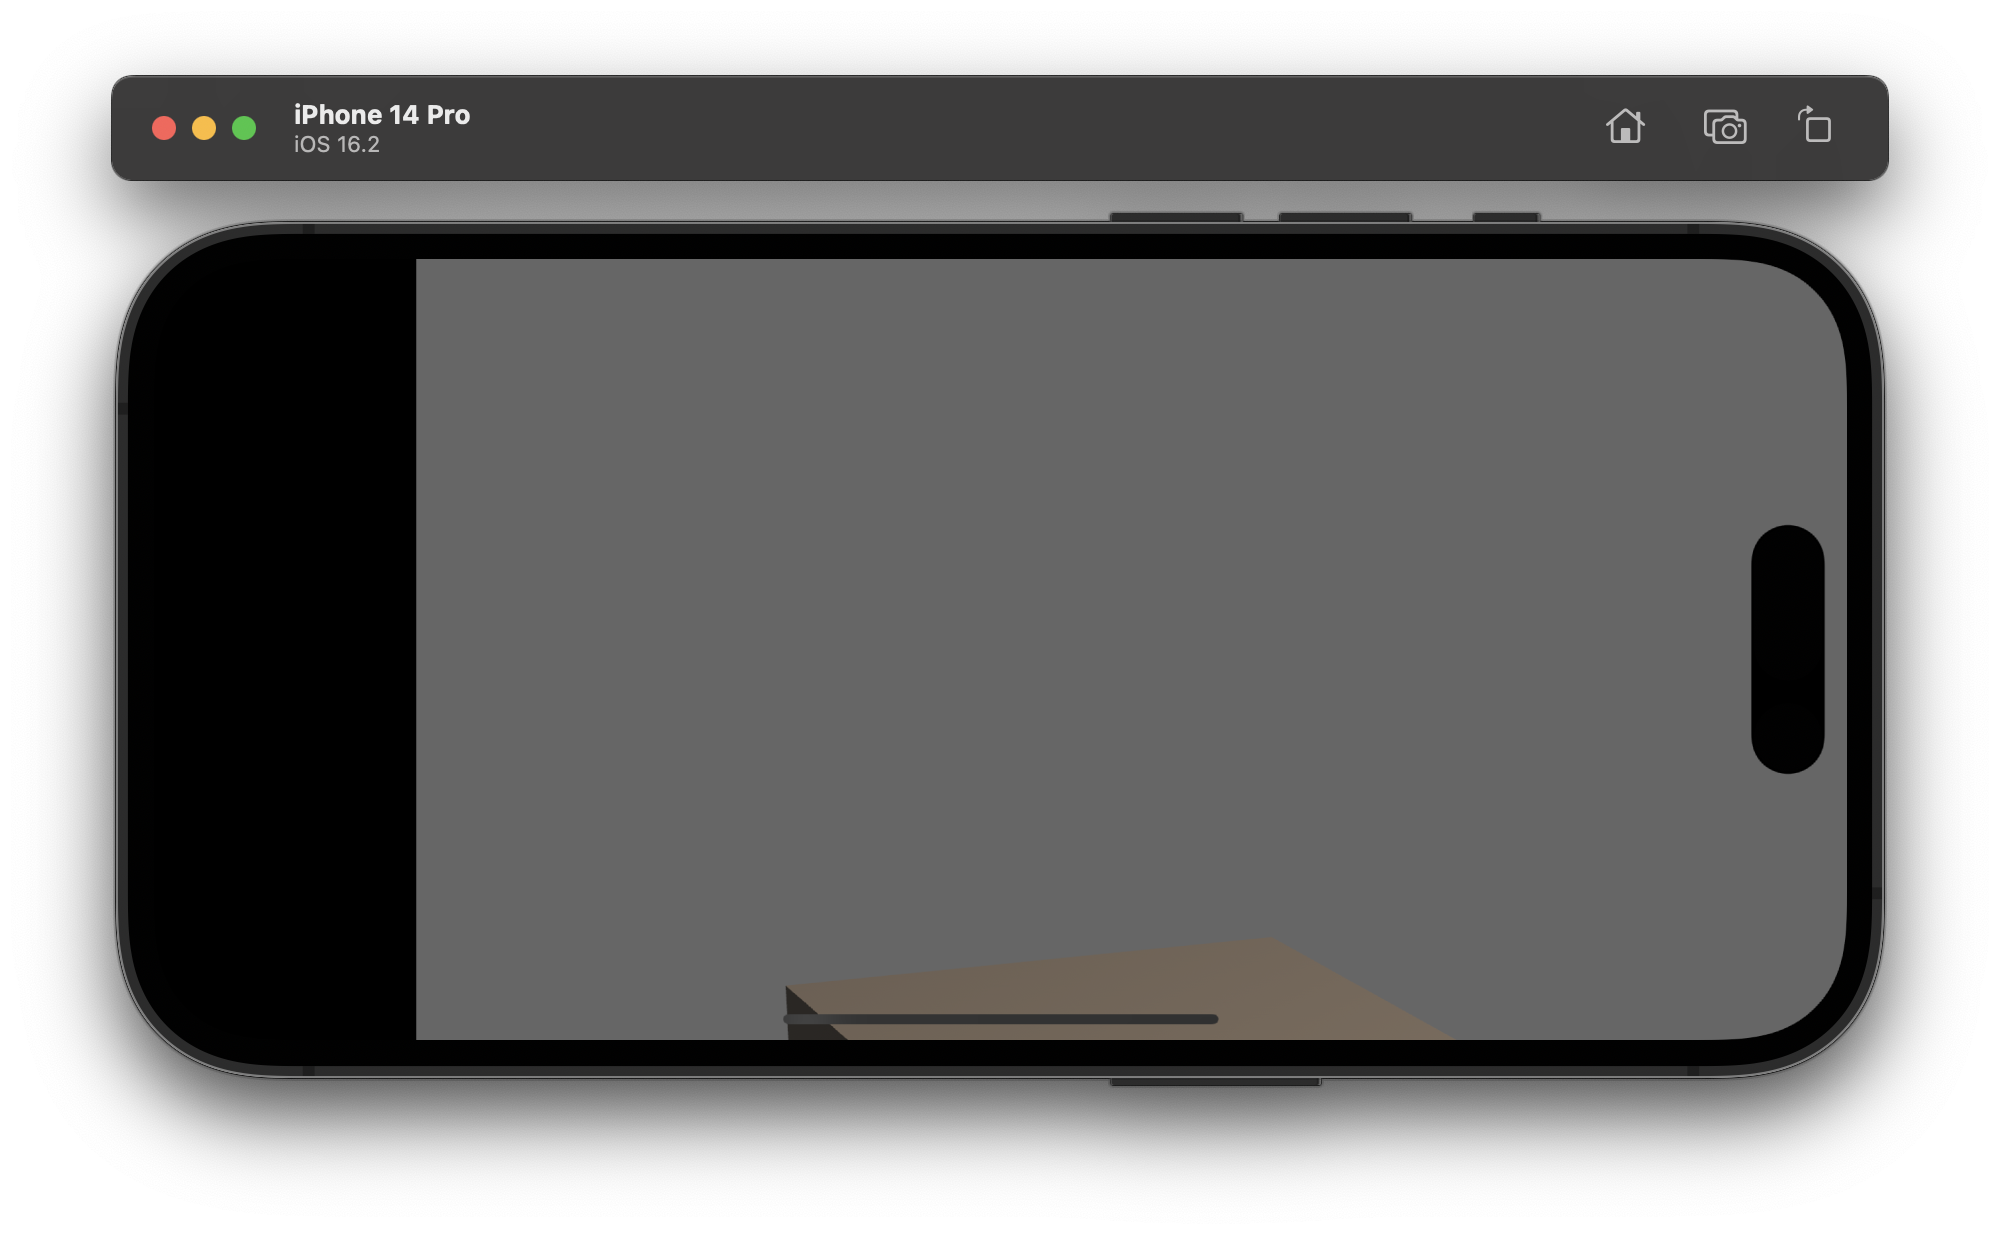
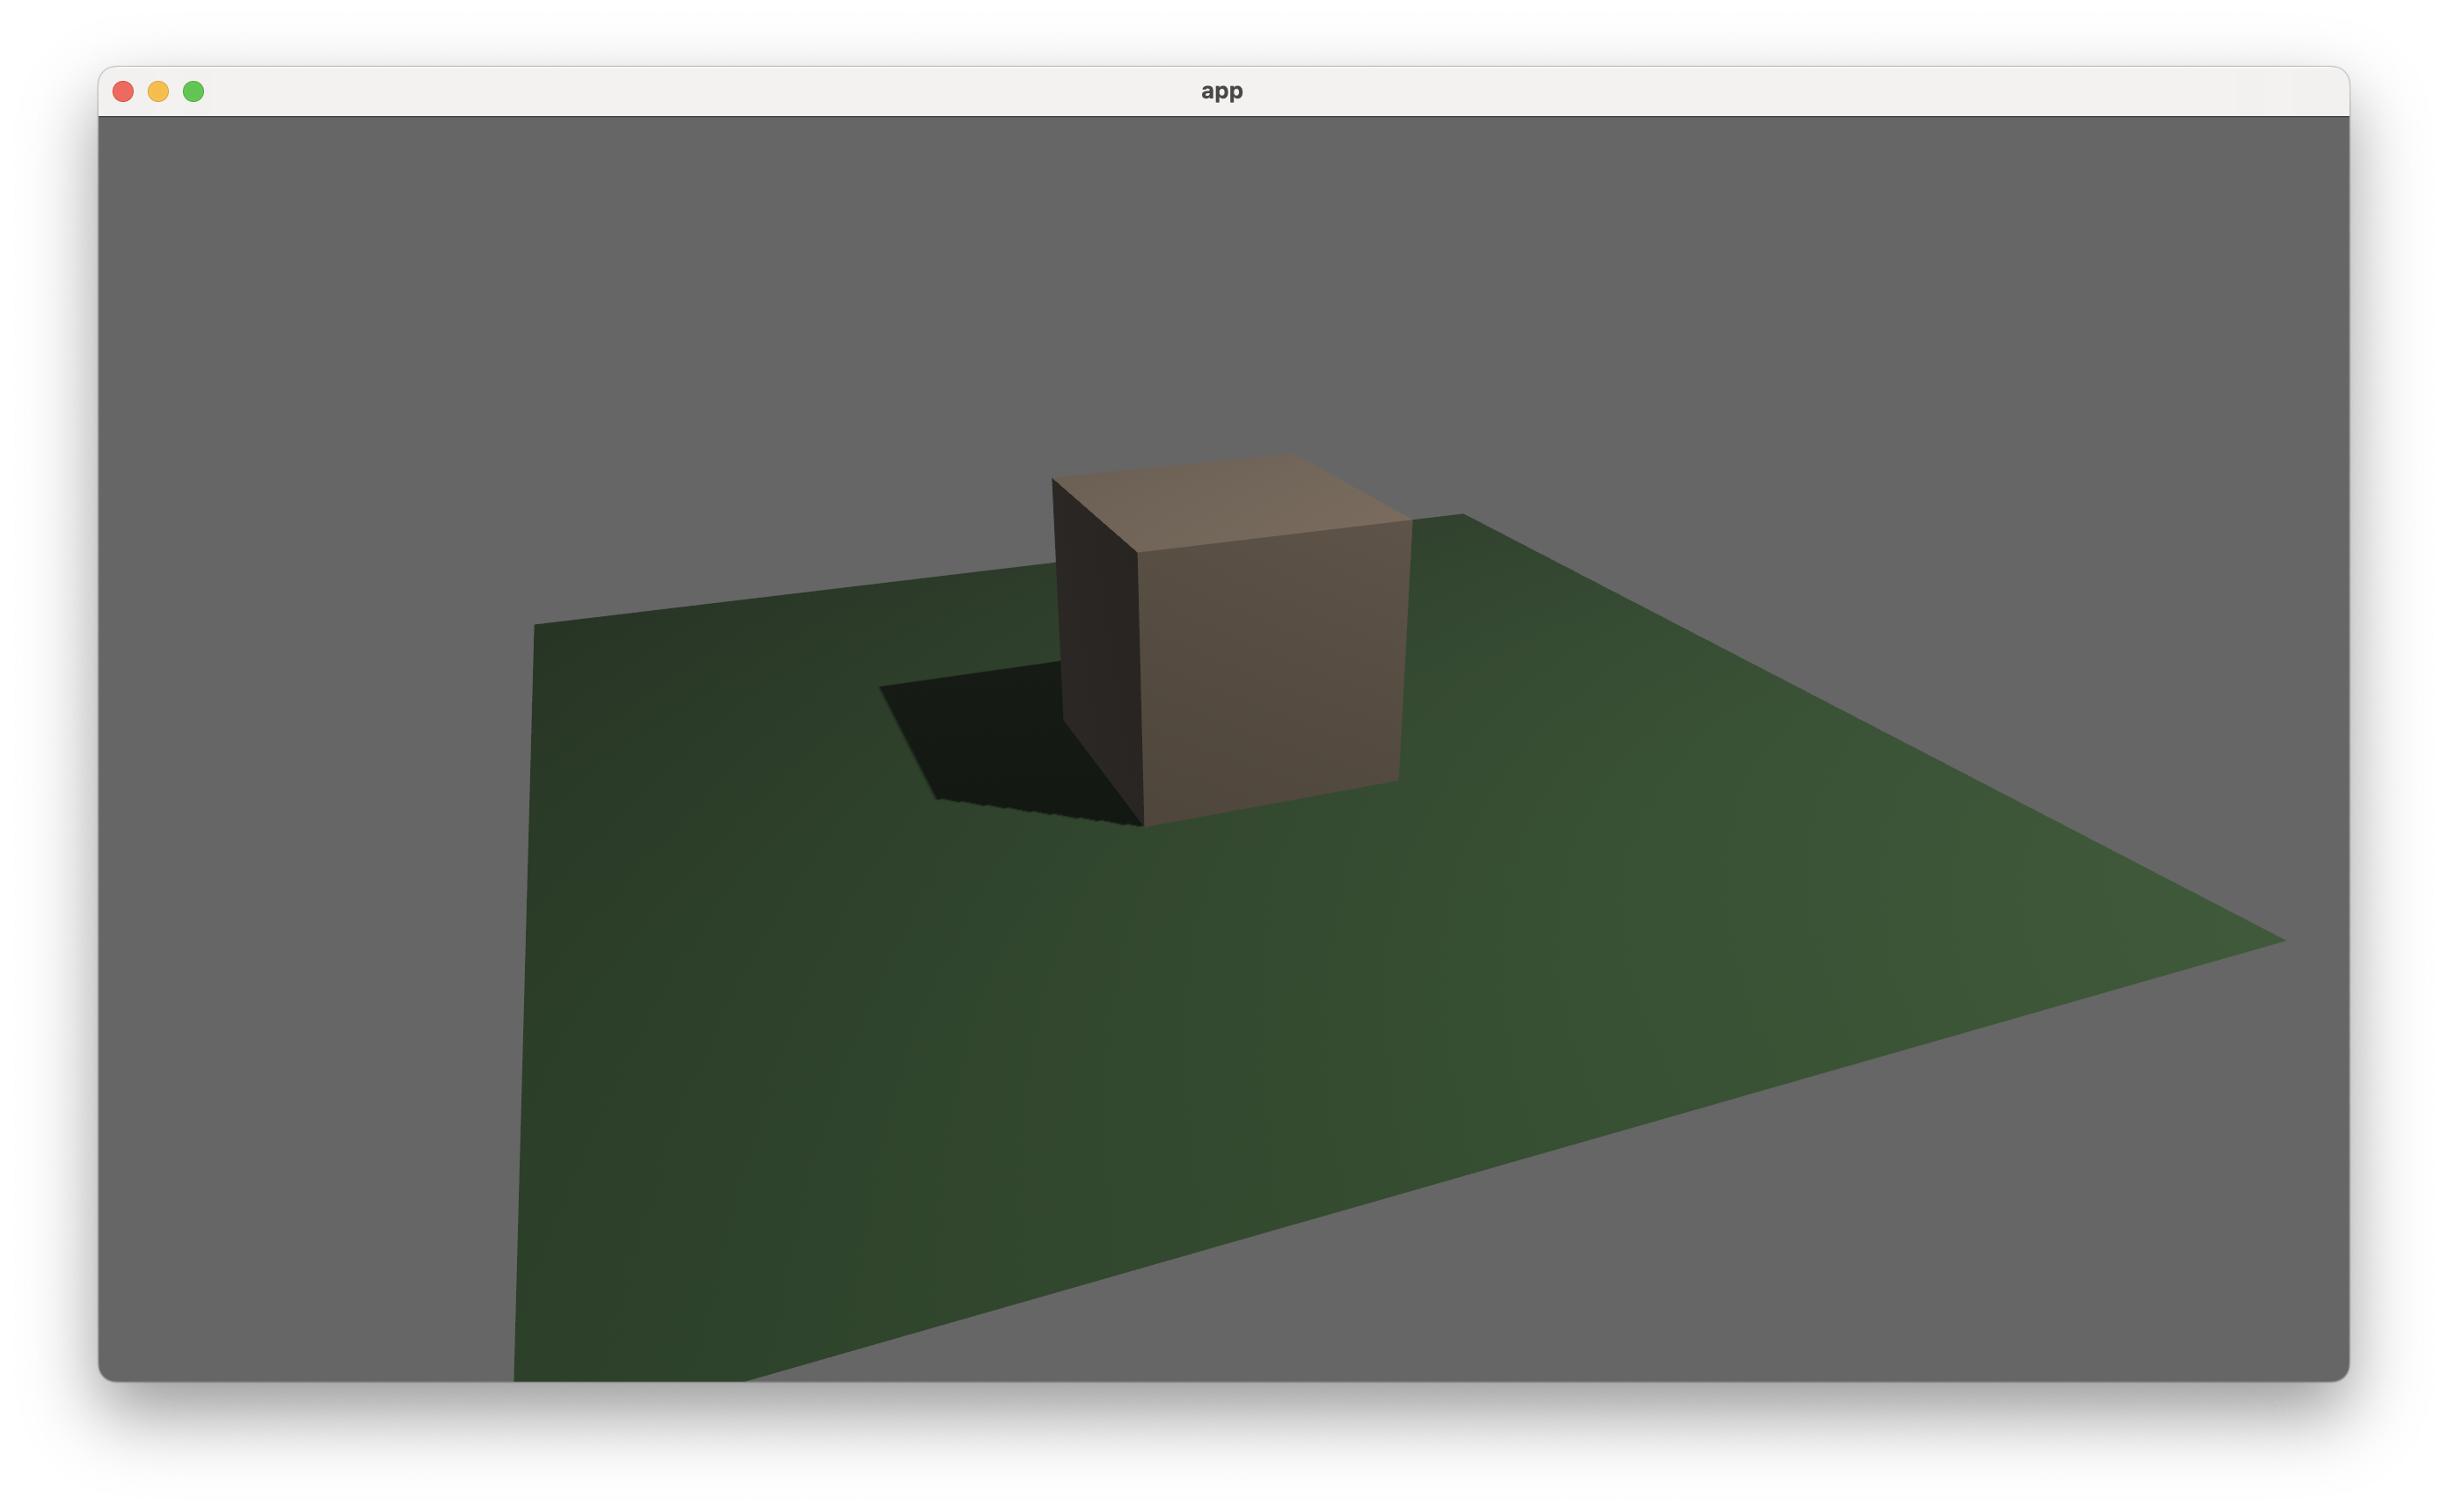
Building and running yields a happy little simulated iPhone with the rust app running… and only half visible. What you’d expect is something like this:
Why does our iOS app have a black box on the left? Why is the camera all off-target?
Well it turns out it’s quite simple. Annoyingly simple 😑
I spent a while looking into how bevy creates windows on iOS, the libraries involved. I looked into the settings of the Xcode project, Info.plist and so on, to see if that was the cause. However turns out the app just wasn’t sizing itself properly and iOS doesn’t allow users to resize apps (obviously). The app can try to set a size for itself that isn’t the same as the iOS device screen, and we get the symptoms seen above. The fix is very simple: make the app fullscreen.
This is easy enough to do, just need to amend the app builder function (our bevy_main):
use bevy::prelude::*;

#[no_mangle]
pub extern "C" bevy_main() {
  App::new()
    .add_plugins(DefaultPlugins.set(WindowPlugin {
      window: WindowDescriptor {
        mode: WindowMode::Fullscreen,
        ..default()
      },
      ..default()
    }))
    // otherwise set up app
    .run();
}
Now that the xcode project is set up, all we need to do in order to rebuild is build+copy the library to the xcode project:
cargo lipo --release
cp target/universal/release/<library> <xcode-project-dir>/lib/.
and then build the Xcode project…
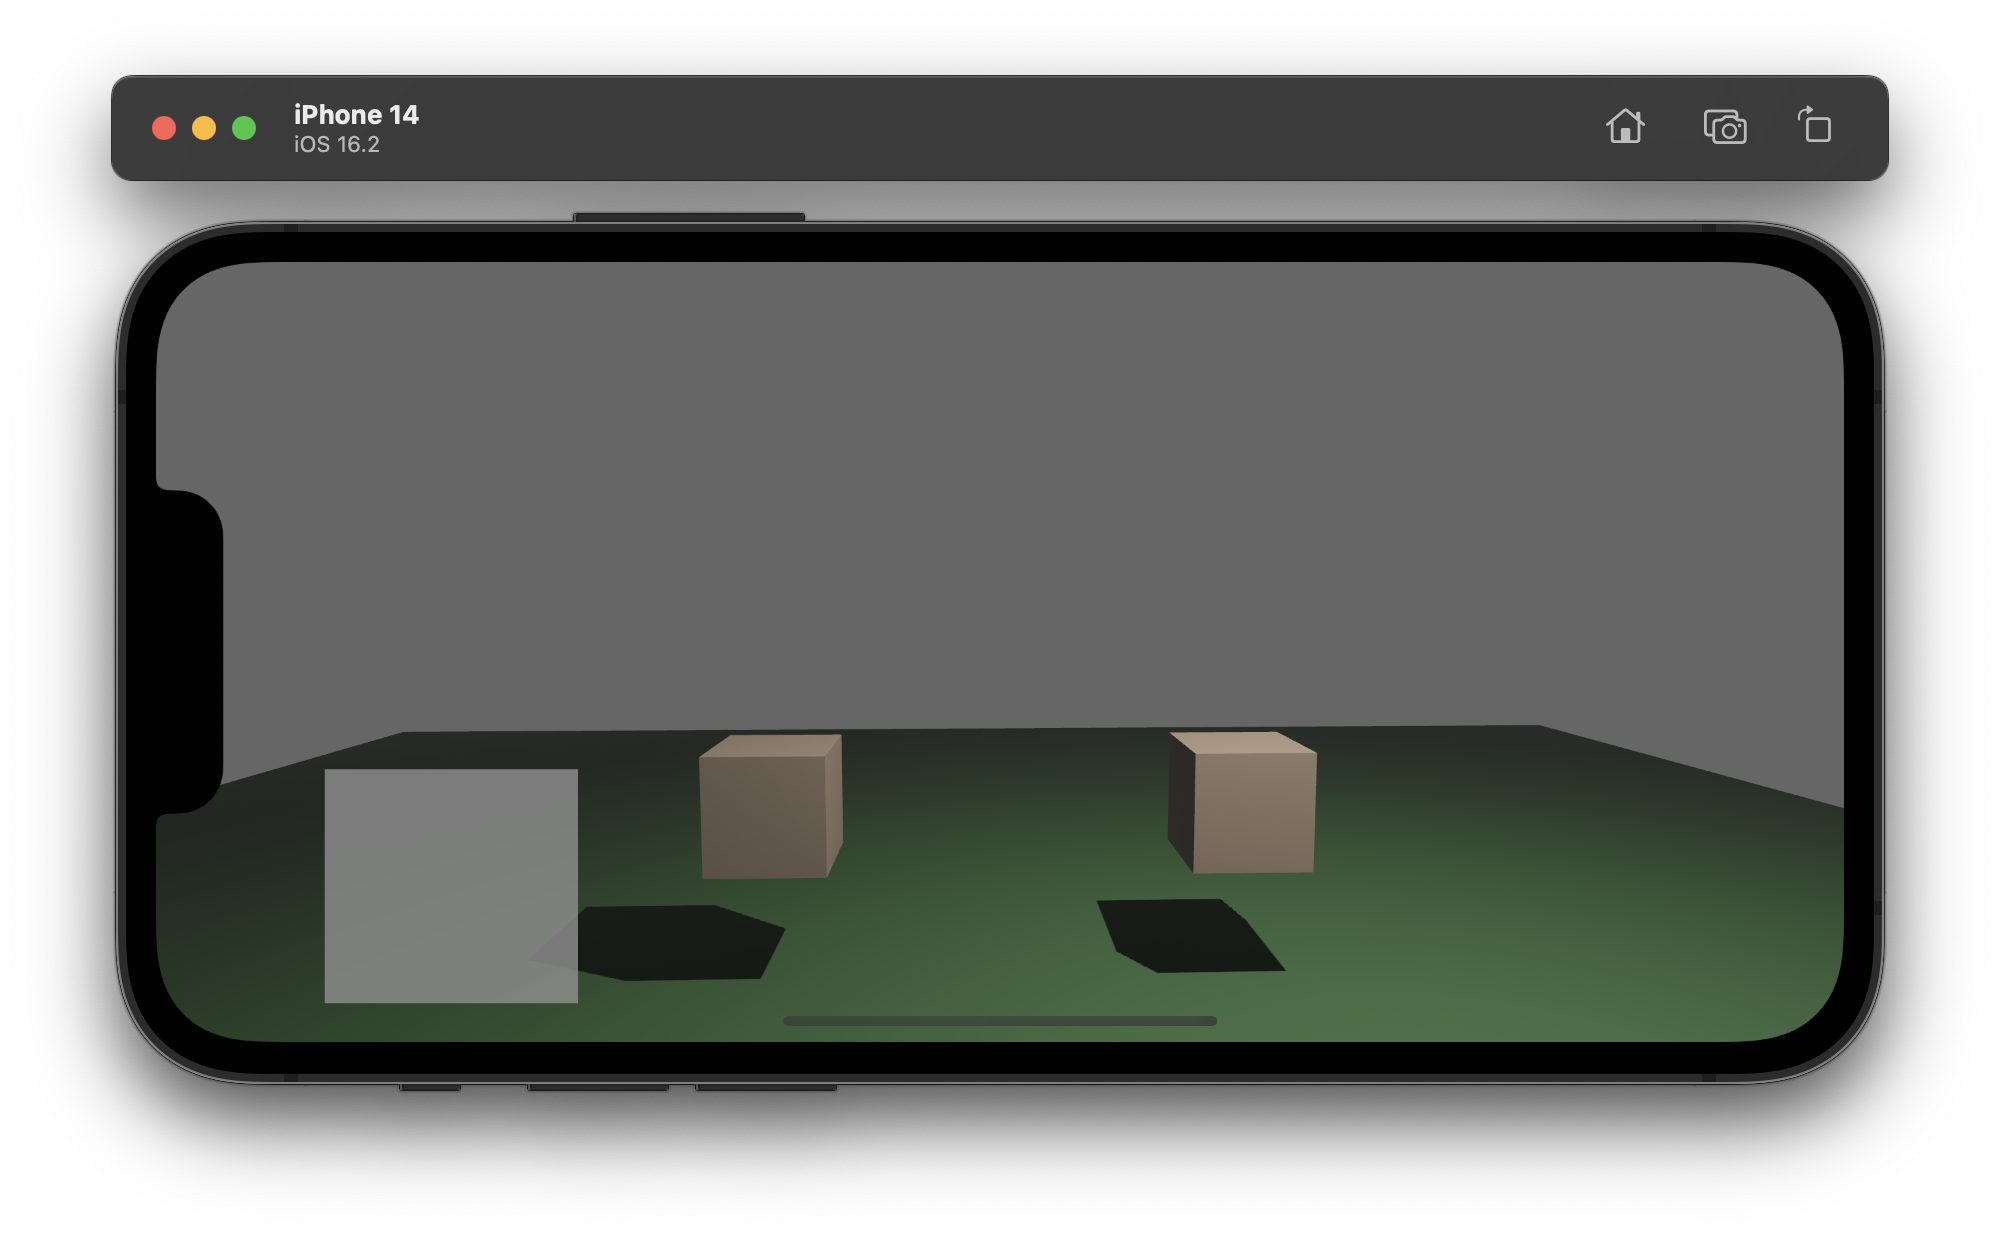
Ah now that’s what I want to see! 😀
Summary of steps
- Install
cbindgen(generateCheaders):cargo install cbindgen - Install
cargo-lipo(build universal binaries):cargo install cargo-lipo - Setup project (staticlib target, extern+no_mangle main func)
- Build using
cargo lipo --release - Generate header using
cbindgen <path/to/lib.rs> -l c > <lib.h> - Set up xcode project (trim Info.plist, remove all but
main.m) - Copy header and library to xcode project
- Add library as linked (in project general settings)
- Add header to search path, add library to search path (in build settings)
- Add frameworks (AudioToolbox.framework, UIKit.framework, Metal.framework)
- Add other libraries (libc++.tbd)
- Edit main.m to use the rust-implemented main function in the library.
Re-building
To re-build the project for xcode after changes to the rust codebase, just need to build the library, make sure the header is up to date, and copy to the Xcode project directory:
XCODE_PROJ_DIR="<path/to/xcode/proj>"
LIBRARY="name_of_library"
LIBRARY_SRC="path/to/lib.rs"

# ensure lib and include dirs exist
mkdir -p ${XCODE_PROJ_DIR}/include
mkdir -p ${XCODE_PROJ_DIR}/lib

# create header
cbindgen ${LIBRARY_SRC} -l c > ${XCODE_PROJ_DIR}/include/${LIBRARY}.h

# build library
cargo lipo --release

# copy library
cp target/universal/release/lib${LIBRARY}.a ${XCODE_PROJ_DIR}/lib/.